I created this film on this topic recently, https://www.youtube.com/watch?v=a8De7U7ObtI and now want to do an article on the same topic.
So in the video I begin by showing you my “toy story film” room in my house, where I have a large collection of toys, gathered for some 30 years. This is where the toys live, and where I have 2 film sets to use to create the film stories.
As in the film, here are the topics I want to cover in this article — with one additional topic I didn’t cover in the film:
(1) Reasons to make toy story films
(2) Equipment needed
(3) Coming up with story ideas
(4) Assembling props
(5) Pros/Cons of different size toys
(6) Creating film sets
(7) Use of other’s content in your film
(8) Tips on photography, videography and stop motion filming
(9) Tips on video editing software
(10) Doing narration and dialogue in your film
So to begin with, there are 4 reasons to make toy story films:
(1) It is magical, it will stimulate your imagination and creativity, and imagination is one of the most underrated powers in the universe. It is a healing power.
(2) So many problems that exist in the world, can actually be solved in a fictional toy story!! Until people experience this, they have no idea how powerful this is…how powerful catharsis is. Entering imaginatively into a story and experiencing a solution for a problem that has upset you, has actual neurological changes on your being.
(3) It gives you a reason to collect toys and be a child again, and allows you to develop the skills needed for storytelling, which is a skill common to novelists and playwrights.
(4) It is fairly easy to do, far easier than a standard film with actors, and inexpensive.
And here are the 4 types of equipment you’ll need to make a toy story film:
(1) Toys, just enough for your film, or your series if you plan a series of episodes.
(2) A camera, any camera will do, as long as it is capable of doing stop motion video.
(3) A tripod to steady your camera as you do stop motion videos.
(4) Some type of video editing program, which I will talk about below.
First Thing Needed: A Story Idea
This is where many people doubtless feel blocked, as they may not have a story idea ready at hand. However, we all have stories just waiting to emerge from us, we just may not know this yet. To get help with this, browse websites oriented to writers, which discuss coming up with story ideas. Here is one of those: https://www.masterclass.com/articles/how-to-find-story-ideas-for-your-novel and here’s another one: https://writers.com/how-to-come-up-with-story-ideas and another: https://kindlepreneur.com/how-to-come-up-with-book-ideas/
Some suggestions that I have:
(1) Think of a problem in the world, anywhere in the world, whether in your own personal life, or the world at large, which bothers you and thus involves a lot of your soul’s energy. It could be a relatively small problem, or a huge one. Think about how you ideally would love to see this problem solved: and please don’t feel like you have to be limited to what you think is realistically possible! We often put ourselves in glass prisons in life, by saying to ourselves, “Well, there’s this problem, but what’s needed to solve it will never happen, therefore we’re all just endlessly stuck.” Allow yourself to imagine various fictional solutions, even magical ones. And then think about possible plots and sets of characters, which would be related to your fictional solution.
(2) Think of a book or movie that you like in some way, but which has some things about it that you don’t like or would like to change. You can change anything you want!!! You can change the plot, so that something slightly different happens, you can change the characters, you can change the ending. In my view, too many Hollywood movies have way too much darkness, violence and cynicism, and too much depravity and evil, and you can change this and make the world a better place by making your own story.
Special Considerations Needed if You Are Doing a Series
If you’re planning to do a film series consisting of several episodes, you’ll need to do more advance planning than for a single episode. You don’t need to think of everything — many things will just fall into place as you flow along — but you do need to think of things such as loose ideas for each episode, and how the episodes will lead into one another and build on each other. In a compelling story, the momentum and the “stakes” involved will gradually rise over time to a crescendo, and often, just at the point where it seems nearly everything is lost, the resolution is found, often by unexpected means.
It’s important for a series project that you get your ideal “character to toy assignments” done in a way that feels right to you, early on. Because you’re not going to be able to change which toy figure is which character, in the middle of the story.
Assemble Your Props
Once you figure out a loose idea for a story, start assembling your props. Figure out what toys and associated props you would need. You will likely be going through a process of weaving back and forth between coming up with a story, and contemplating what types of toy figures and/or props would be needed to tell that story, and you may change the story idea to fit your available props, or get more props to fit the story.
Do keep in mind that due to the magic of green screen, (more on that below) as well as other filmmaking techniques, you do not need to have props for absolutely every character or part of the story. For instance, suppose that you want to have a film scene that takes place in an Italian mansion. Well, you don’t need to buy an elaborate dollhouse that looks like an Italian mansion. Or paint elaborate backgrounds of such. You may be able to get by with a few photos or videos of the exterior and interior of an Italian mansion, which you find online, and then a film set you create which has some dollhouse furnishings as well as possibly some “green screen” furnishings that you put in place using green screen techniques.
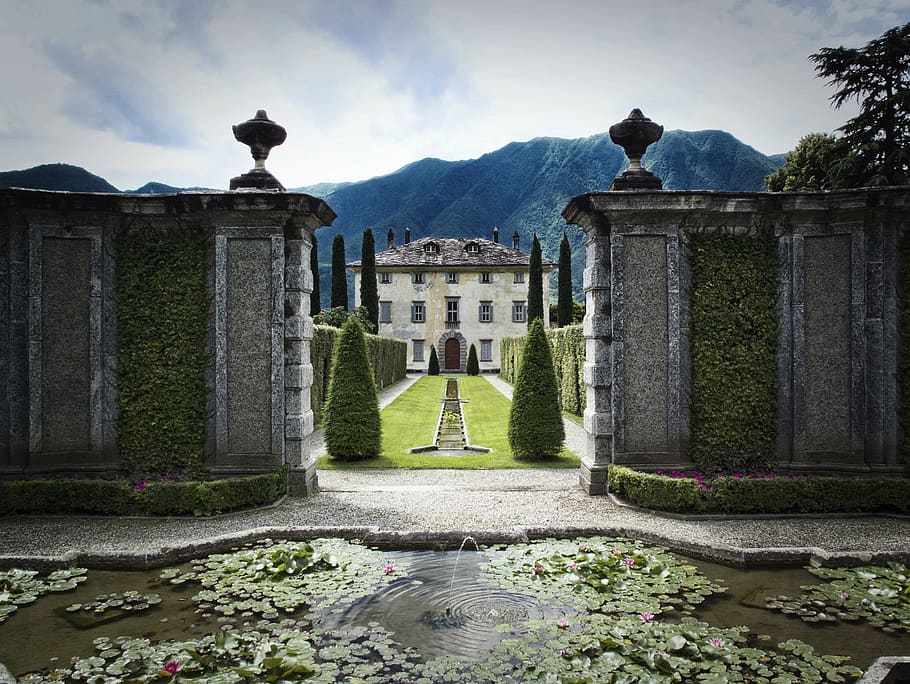

These are photos of Italian mansion settings that I found online. Below, I’ll discuss more about using other’s work in your film.
Options for Toy Figures
One can make toy figures out of clay, in which case you’re not actually doing a “toy story” video, but are doing what is known as “claymation”. However, making figures out of clay to use in a film is a lot more labor intensive and not likely something beginners are going to jump into, compared to just using standard manufactured toys. So we’ll focus on using toys you can buy.
One can also use hand puppets or stuffed animals for a toy story film, that is one genre, though for my purposes I find that too limited, as you can’t have hand puppets driving in toy cars, walking into dollhouses, or doing much of anything physically in a “world” that you create. You’re limited to having the upper part of them showing in various backgrounds. Stuffed animals can be used in stop motion films, but aren’t as desirable for several reasons as the toys I’ll describe below.
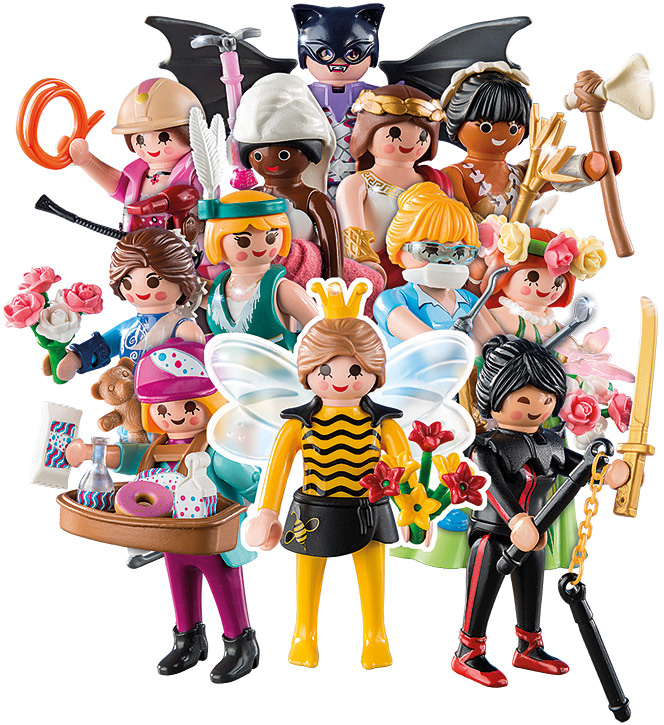
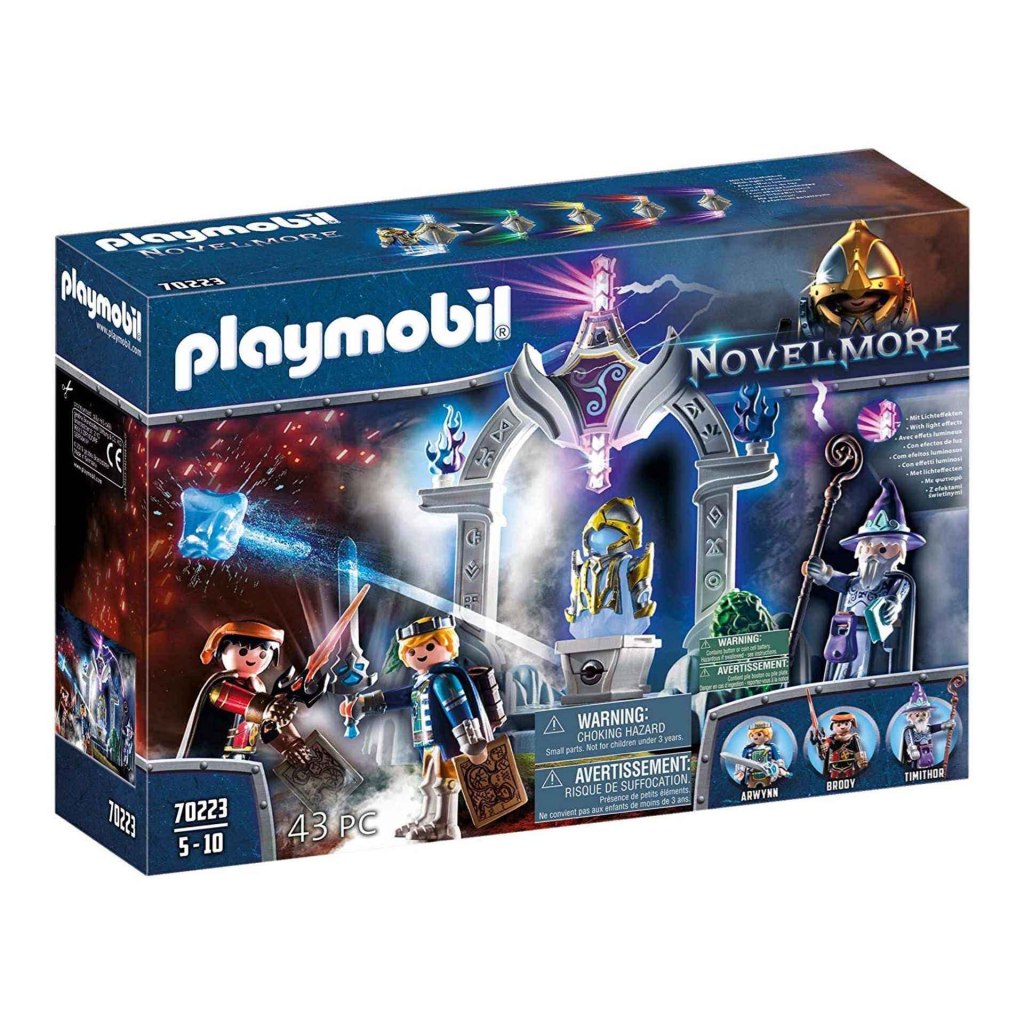
So, as regards toy figures, the primary toys available come in 4 sizes, as shown in this photo from the film:

The 4 sizes shown range from the Lego figures as the smallest, around 1.6 inches tall, to the 3 inch Playmobil and Calico Critters figures, the 6 inch Lorrie and many other figures, and then the 12 inch Barbie, Ken, GI Joe, World Peacekeeper, and other specialty figures. There are toy vehicles in all these 4 sizes as well, along with even smaller scale cars. The matchbox cars for instance are 1/64 scale and the figures that would be of that scale, about one inch tall, are too small to be recognizable as individual characters, and thus have meaning to use in a film story.
You can obtain these toys at new or used toy stores, and online sites selling new or used toys, as well as garage sales and free boxes. There are many unusual toy figures, some which were made a long time ago and not widely available any more, some which are specialty items aimed at adults not children, and these you can generally find on Etsy or EBay.
Pros and Cons of Different Scale Toy Figures
There are various pros and cons of using these different size toys.
The two smaller size figures, the 1.6 inch and 3 inch toy figures associated with Lego and Playmobil or Calico Critters, are most advantageous in that you can obtain a LOT of different props for this size figure. All kinds of vehicles, all kinds of houses and structures, realistic or fantasy style, are available for these two sizes, particularly from Lego and Playmobil, which have quite imaginative products.
For the larger 6 inch and 12 inch figures, you will have a lot more difficulty finding props that you can purchase, as far fewer are made for these. You’ll find clothing and small items like guns, cameras, food items, but few vehicles, and very few entire houses or structures. Hence, if you want to use the larger toy figures, you may have to make your own props. You can actually make a number of things such as books fairly easily using foam board and printed out images. You can also build rooms or even a whole house for 6 or 12 inch figures, though these will take a lot more space than those for 3 inch figures.
The smaller figures are more advantageous for another reason: they can stand up by themselves, which the 6 and 12 inch figures do not readily do. So, in terms of doing stop motion video, where you show figures “walking” across a surface, that will be a lot harder to do with 6 and 12 inch figures as you’ll have to come up with some way to keep them upright. This can be done but it is extra work. A technique I use for indoor sets, is to find some heavy objects, like a small piece of heavy metal or flat stone cut into a sufficiently small size, and use rubber bands to hold the figures’ feet to these. Works better for 12 inch than 6 inch figures. Outdoors, you can use long craft needles, 4 to 8 inch needles available in fabric stores, to push into the ground and then insert the other end into the pant leg of your figure. This will usually hold them upright.
Keep in mind too, that everything to do with creating film sets for the smaller figures, is smaller, and for the larger figures, is larger, so will take more space. Also, if you are taking toys with you to go to a place outdoors to do filming, you will be carrying a lot less weight if you are using smaller figures. For instance, I’ve gone on hikes where I carry some Playmobil figures and a Playmobil vehicle in my backpack, along with a camera and tripod, and I can walk 2 miles or more with these. But for the 12 inch figures, a vehicle for them is quite heavy and large, and cannot be fit into a backpack and taken on a hike. You actually wouldn’t want to have to walk more than about 200 or 300 feet with such heavy and large items. So, as you can see, outdoor filming for the larger figures would be limited to places close to where you can park.
And anytime you’re filming close to where you park your car, there is more likelihood of other people around, and people walking through your film set. I’ve many times had people walk right through my film set, while I was in the midst of stop motion video recording, which was set up next to or on a trail (a narrow trail in park is a great stand-in for a dirt road in your story, as it is about the width of a dirt road at the scale of the toy figure). This results in people getting into your stop motion video, which you then need to edit out. As you are in or next to the trail you can’t tell people not to come through, they need to come through, so you just hope that for whatever the time span is for your stop motion film, the people don’t come through just then. Even when I try to find lesser used trails, I still will at times have people walking through my filming.
The Magic of Green Screen Allows Toys of Different Scales to Seem the Same Size
Time to mention green screen magic. Green screen refers to the green background that is used when making photos or videos, from which the green background can later be removed in a video editing technique, such that the image will “magically” appear to be part of your scene. You can find many green screen photos and videos online, generally produced just for you and other creators to use. You can also make your own green screen background image, by using Adobe Photoshop or Photoshop Elements, or similar. This just involves photomerge, where you import 2 photos, one of your subject, and one of a green screen background which you find online, like this:

Then, you cut out your subject, paste it onto the green screen, and now you can put that in a video editing program, remove the green background, and wa-la, your subject will appear on top of whatever scene you want, and seem to be part of it. As you can begin to see, this technique will allow you to combine toys of different sizes and make them appear to be the same scale.
Making Your Film Sets
A film set can be created very simply with a table covered by colored paper or fabric, and a background of colored paper or fabric, or some type of purchased backdrop. You can use a variety of items to create a surface: as mentioned colored paper, either in rectangles from the arts and crafts store, or rolls of paper. You can use different types of fabric, fake grass, wood, or a painted surface. Similarly for the background. There are roll paper backgrounds of blue sky with clouds, and you can easily paint backgrounds of sky and hills, or other simple backdrops.
Depending on the size of your toys and the number of props you want to set up, a 3 to 4 ft wide table may be sufficient, or you may need something larger.
You can build a variety of rooms, houses and structures using painted cardboard, foam board or plywood. There are a great number of how-to videos online, showing you how to make various “dollhouse miniatures”, such as sofas and chairs, detailed rooms, all sorts of things. This is one channel dedicated to making dollhouse miniatures: https://www.youtube.com/watch?v=zO9XceHxJHE
In general, it’s much more comfortable as well as convenient, to do your filming at an indoor film set, as compared to doing your filming outdoors. I mentioned some issues above related to doing filming at outdoor locations. In addition to the need to lug toys to and fro to an outdoor site, and having the possible disruptions caused by passers-by or even people walking right through your “set”, as well as issues with less than desirable weather, there’s the issue of comfort. You may not realize it until you start trying to film outdoors, that filming toys on the ground requires you to either lay on the ground or sit very low on the ground, which is not that comfortable. It can also be messy, as when the ground is wet. It can easily cause you to strain your back or neck into uncomfortable positions, to film toys sitting at ground level. It’s a bit easier if you are filming them somewhat higher, as on a rock or tree, but for the most part you’d likely be on the ground.
By comparison, when the “ground” is created on a table in a room in your house, you can sit or stand with reasonable comfort, to do the filming.
Filming Techniques
Most people can figure out how to do photography and video of their toys and sets, so I don’t need to say too much about this. If you want any tips, look on YouTube for instructional videos. When you do stop motion videos, there are a few things to keep in mind. Stop motion videos are created when your camera compiles a sequence of still photos it takes. So you will for instance set up a car driving along a surface, and by moving it 1/2 inch with each successive photo, it appears to be driving along. The main thing to know when doing stop motion video, is that it helps to keep the lighting even, otherwise you have annoying sudden and rapid changes in light in your video. This is caused when you have natural light on the scene and the natural light changes, eg when the sun goes behind a cloud, then comes out again. So, if possible it’s best to not use natural light in a stop motion video, but use studio lighting.
There are also many tutorials on stop motion techniques: it’s not hard to figure out how to do these with a Stop Motion App on your phone. Some cameras, like Olympus OM-D cameras, have a stop motion setting to use to create these.
Using Other’s Content in Your Film
Newbies to filmmaking often assume you can never use other’s content in your film. That is not true. There are 2 things to be aware of in this regard.
(1) Some people make content specifically for others to use, eg the many sound effects and green screen videos on YouTube, those are there JUST for others to use!
(2) A policy known as “Fair Use” https://www.youtube.com/watch?v=1PvjRIkwIl8 explains when you can use other’s copyrighted work in your own.
In general, it’s permissible to use PART of someone else’s work in yours…for instance, you might use a 10 second clip from a 1.5 hour movie. Or 15 seconds of someone’s 4 minute song. This is usually the case, but not always. Sometimes you will discover that you can’t put even 3 seconds of someone else’s content in your video without YouTube blocking your whole video so it can’t be viewed at all.
The only way to find out if a particular work is copyright protected, and to what degree, is to put the part of it in your film that you want to use, upload it to YouTube, and see what happens. There are typically 3 ways this can go:
(1) The material isn’t copyright protected on YouTube and there’s no impact upon you. (This doesn’t mean the material isn’t copyrighted, it just means that isn’t happening or isn’t detected on YouTube)
(2) The material is copyright protected and you can use it, but can’t monetize your video.
(3) The material is totally copyright protected and you can’t use it at all, because putting any amount of it in your video causes the entire video to be blocked. In which case you have to take it out of your video.
I actually do not know much at all about using others’ photos in your video. Many of us regularly use other’s photos, eg that we find in image searches online, but it’s not clear to me how fair use guidelines apply to this. You’d obviously be using the whole photo, not a small part of it, but the photo would likely be a small part of your overall work.
Software to Use to Obtain Other’s Content
To download videos from YouTube (as well as Rumble, BitChute, Facebook) I recommend 4K Downloader. I recommend Techsmith’s Snagit software for doing video screen recording of anything showing on your video screen.
Video Editing
Video editing is where all the magic happens in your filmmaking, and it’s the least understood (for newbies) and most complex part of the process.
There are many different types of video editing programs, and you can read various reviews about them online. https://www.pcmag.com/picks/the-best-video-editing-software and https://www.creativebloq.com/features/best-video-editing-software-for-designers are two such review sites. Some video editing programs are free, such as Adobe’s Rush which is ideal for smart phone use, but most of them you pay for, either a one time cost or monthly fee.
If you compare various reviews, you are likely to find that Adobe Premiere Pro is often rated “best for professionals” and Adobe Premiere Elements one of those rated “best for beginners.” These are the 2 that I use. I began with Adobe Premiere Elements, and moved on to Adobe Premiere Pro after about a year. I continue to use both of them, as somewhat to my surprise, the simpler Adobe Premiere Elements (Adobe PE) has techniques/options in it that are not available in the more expensive Adobe Premiere Pro (Adobe PP). To give examples: Adobe PE has built-in music tracks, Adobe PP does not. Adobe PE has many more types of video transitions than Adobe PP, and some of them can be used not just for transitions but for special effects in various parts of the film…such as the “shake” transition which can simulate an earthquake. Also, Adobe PE has effects that Adobe PP does not, and one of the most interesting of those to me is the “Cartooner” effect which can change your video into many different styles of a cartoon representation. Adobe PE also has some audio editing effects that can change your voice, beyond just what pitch shifter allows. So I use Adobe PE side by side with Adobe PP. Adobe PP is much more powerful in many ways and has several techniques not available on Adobe PE; such as warp stabilizer to stabilize video shaking, more color editing options, more lighting effects options, and use of masking for various video effects. The sound quality is also better overall on Adobe PP.
There are MANY instructional and tutorial videos on YouTube showing you how to do various aspects of video editing. There are more such tutorials for Adobe Premiere Pro than for Adobe Premiere Elements, likely because more use Adobe PP.
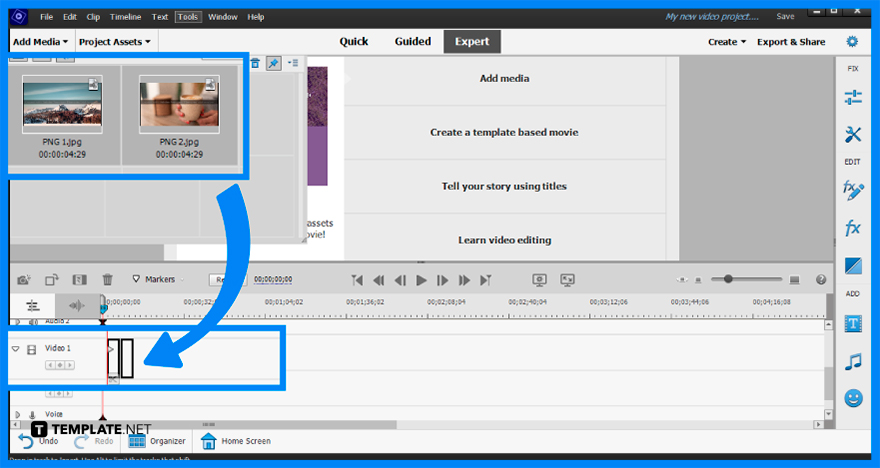
The basic way that video editing works, is that you import all the photos, videos and stop motion videos that you want to use, and then arrange them in whatever order you want, on what is called a timeline in the software program. This photo below shows how you would drag a photo or video from your project assets in Adobe PE, into the timeline, which is the area on the lower part of the screen.
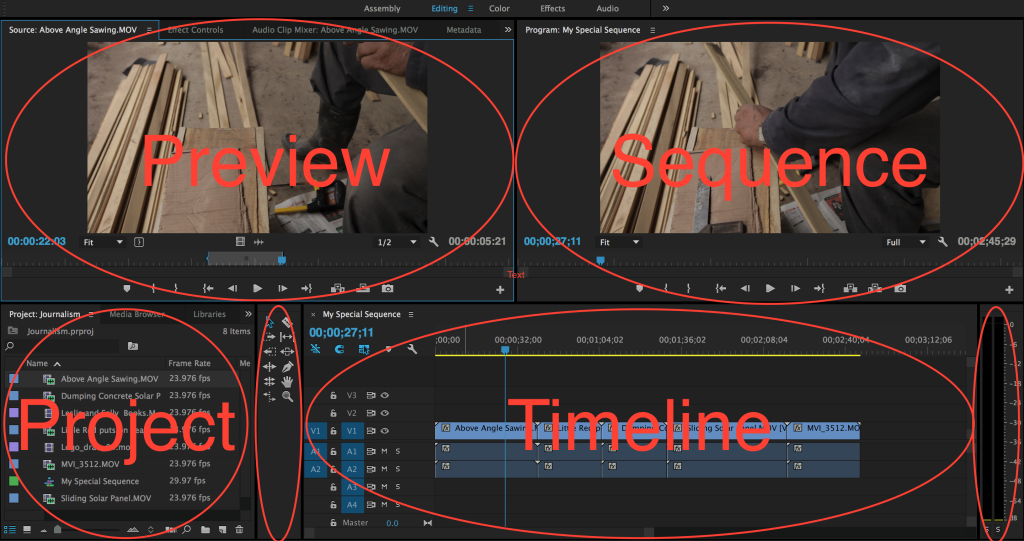
Adobe PE’s layout is more intuitive…this image below shows the layout of Adobe PP. It’s not as easy to use, takes some time to learn, but once you learn it, it is quick and works more efficiently than Adobe PE layout.
Note that for Adobe PP, it will set the project settings based on the first item you put on your timeline, which may not have the settings you want for the whole project. For instance, if you upload a stop motion video first, it will have a frame rate of 5 frames per second, which is significantly slower than standard video of 30 frames per second. Yet because you put that stop motion clip on first, that is causing the whole project to set at 5fps, which will result in the standard videos playing in a jerky way. You need to reset the sequence settings to 30fps to stop this from happening.
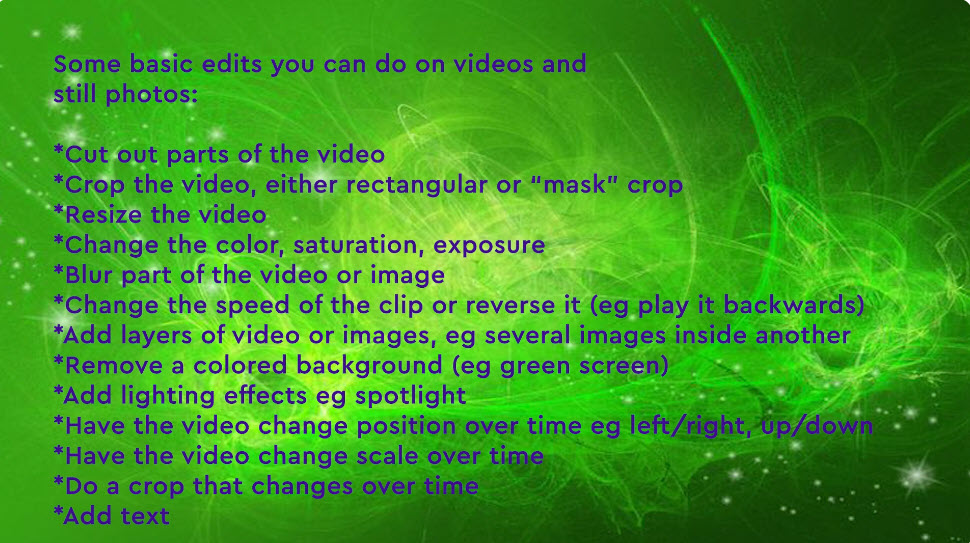
Once you get your clips and photos on the timeline, then you can begin to edit them. You can do all kinds of video and photo edits, such as:

And you can do all kinds of audio edits, including:

In my video on how to make toy story films, I demonstrate use of some interesting video editing techniques, so you can watch that if you would like to see those. I also mention that there are LOTS of instructional and tutorial videos on YouTube, more for Adobe Premiere Pro, but also some for Adobe Premiere Elements, showing you how to do all kinds of things on these programs.
Once you’ve done your video edits, you can add any sound effects, music, narration or dialogue that you want to your timeline, and do audio edits for those.
Narration and Dialogue
The main options for narration and dialogue are these:
(1) Use your own voice as is
(2) Use your voice changed with pitch shifter or other audio effects
(3) Use others’ voices, such as those of friends or family
(4) Use AI voices
My recommendation is that you don’t use voices of friends or family, unless these are people who are sufficiently accessible that they will be available every time you need to do an edit that requires recording a new audio clip, and, if you plan to do a film series with several episodes, will be fully available for all of those.
Use of AI voices is in general not recommended to use for film characters. The reason for this, is not because these voices do not sound “real.” They do sound real, at least the higher quality ones, such as those one can find at http://www.revoicer.com which is the site I use to create some voices. So the problem isn’t the lack of an authentic sounding voice: it’s that you have no way of controlling the emphasis, tone or intonation in any given bit of narration or dialogue, when using AI voices. For instance, an AI character voice cannot know if you want to say “that’s a loooooooooong way to go!” or “that’s a long way to go!” Stretching out a word like that for emotional emphasis, isn’t possible on AI. All kinds of varieties of intonation that convey certain emotions, cannot be done through an AI voice. AI voices will do some types of emphasis based on sentence structure, but they have no way of knowing exactly what you want, from the many many possible ways to vary the emphasis and intonation in a given statement. Likewise, a sentence can have very different meanings, depending upon which words are emphasized. Eg:
“I did not kill him” can be:
“I did not kill him” (suggesting the speaking character may have killed someone else)
“I did not kill him” (suggesting someone killed him, but not the speaking character)
“I did not kill him” (suggesting character did something to him, such as assault, but not murder)
AI voices cannot figure out which of these options you want. On Revoicer program for instance, it’s not possible to italicize text when you input it, to try to suggest to the AI which words to emphasize.
Several Projects May Be Needed to Compose One Long Video
Because I’ve experienced Adobe PP crashing when I try to compose large projects (eg that have hundreds of different clips), I suggest breaking down your film project into several parts, and then when each is finished, you can combine the parts into one whole film project.
When Done with Video and Audio Edits, Export the Project and Upload Online
After you have finished everything in your project, you can “export” the project to upload online. When exporting, you can choose in what resolution you want the video, eg 720p, 1080HD, or 4K. You can also set the export settings to intentionally make the final video of smaller file size. This comes in useful for instance if you are uploading to BitChute, which has a 2GB max file size. Be sure you get the video as you want it before uploading it, because you can’t edit the video once it’s uploaded, except in limited ways such as to trim some off the beginning or end. If you realize you need to edit it after you have uploaded it, you have to upload a new version.
Be Yourself
Finally, I want to underscore the importance of being true to your own vision in your work. Most people who have an artistic inclination innately understand this, but not everyone. A number of people are too focused on trying to please others, trying to create something that others will like. But doing that cannot make you deeply happy when your soul is calling you to express yourself more authentically.
Yes, there are people whose videos routinely get hundreds of thousands or millions of views on YouTube. But I strongly suggest you do not fixate on numbers of views. That is toxic to your process, contaminating it with the wrong focus. You would do best to simply stay focused on creating what you feel your soul wants and longs to express. It may take some time to find that, but the more experience you obtain in doing creative work, the more you will understand why it’s so very important that you stay true to your own vision, values and ideas.